
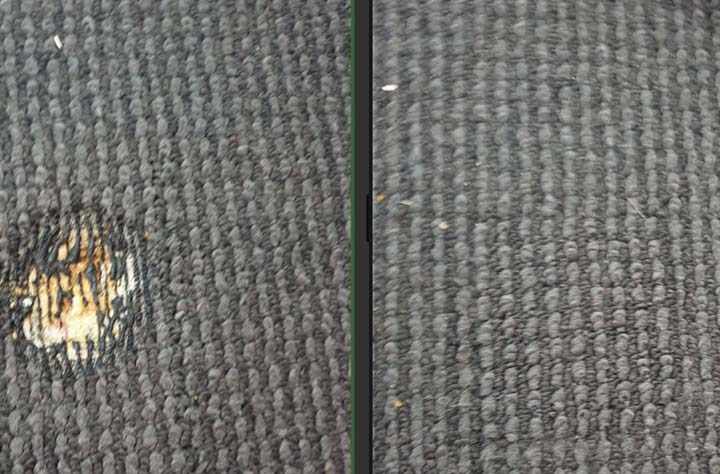
You can repair most small carpet burns yourself without replacing the entire carpet. The method you choose depends entirely on the depth of the burn. Surface scorches need trimming. Deep burns that have destroyed carpet fibers require a patch taken from a hidden area like a closet. This guide walks you through both scenarios, including the tools you will need, step-by-step instructions, and the honest limitations of each repair.
Carpet burns happen. A dropped curling iron, a stray ember from the fireplace, or a hot pan placed on the floor can leave an ugly mark that stares at you every time you enter the room. If you are renting, that mark can cost you your security deposit. The good news is that professional-looking repairs are possible with patience and the right technique. Let's get your carpet looking right again.
Assess the Damage Before You Touch Anything
Your first step is not grabbing scissors. It is kneeling down and examining the burn under good light. Carpet burns fall into two distinct categories, and treating the wrong one will make the damage worse.
Surface scorch: The tips of the fibers are blackened or melted, but the base of the carpet and the backing are intact. You can still see the carpet's original color below the damage. This is the easier fix.
Deep burn: The fibers have burned down to the backing. You see a hole, a hard black crust, or the mesh backing material is visible. This requires surgical carpet surgery.
Gently rub your finger over the burn. If the tips crumble and the base feels solid, you are dealing with a surface scorch. If your finger goes into a depression, you need to patch.
How to Repair a Surface Carpet Burn
This method works when only the top portion of the fibers has melted or charred. You are essentially giving your carpet a very localized haircut.
Tools You Need
- Sharp scissors, ideally small embroidery scissors with fine tips
- A clean metal spoon or a stiff brush
- A vacuum cleaner with a crevice tool
- A spray bottle with water mixed with a drop of mild dish soap (optional)
Step 1: Remove the Blackened Tips
Take your scissors and carefully snip away only the blackened, melted tips of the carpet fibers. Work in small, precise cuts. Do not cut down to the backing. Leave at least some of the original fiber length behind. The goal is to remove the visible black char, not to create a bald spot.
A common mistake is cutting too deep too fast. Cut less than you think you need. You can always trim more. You cannot put fiber back.
Step 2: Agitate the Fibers
After trimming, the area will look flat and unnatural compared to the surrounding carpet. Take your metal spoon or stiff brush and gently scrape or brush against the trimmed area in a circular motion. This fluffs up the cut fibers and blends them with the untouched carpet around the burn.
If the fibers are stiff from heat damage, lightly mist the area with the water and dish soap solution first, then agitate. The moisture helps relax synthetic fibers.
Step 3: Vacuum Thoroughly
Use the crevice tool to vacuum the repaired spot aggressively in multiple directions. Vacuuming lifts the fibers and removes loose char particles. Run the vacuum over the spot, then back over it from a different angle. Do this several times.
What to Expect
For small scorches on medium to high pile carpet, this method often makes the burn invisible to anyone who is not specifically looking for it. On low pile or looped berber carpet, trimming is more noticeable because you cut the loops. We will address looped carpet later.
How to Patch a Deep Carpet Burn
When the burn has destroyed fibers down to the backing, trimming will not fix it. You need to cut out the damaged section and replace it with donor carpet from an inconspicuous area.
Tools You Need
- A carpet repair kit or a utility knife with fresh blades
- A metal carpet tape or a scrap piece of adhesive carpet seaming tape
- A hot glue gun or carpet seam adhesive (if not using self-adhesive tape)
- A donor carpet piece, ideally from a closet or under a piece of furniture that never moves
- A straight edge or ruler
- A marker or chalk
- Tweezers
- Scissors
Step 1: Harvest a Donor Patch
Go to your closet, a corner behind a large sofa, or any permanently hidden area. Your donor piece must come from the same carpet. Even the same model carpet bought years apart will look different due to wear, fading, and dye lots.
Use your straight edge and utility knife to cut a square slightly larger than your burn damage. For a round burn the size of a quarter, cut a donor piece at least a two-inch square. This gives you material to work with. Cut carefully through the backing. Lift the donor piece out.
Step 2: Cut Out the Damaged Carpet
Place the donor piece over the burn mark. Align the carpet pile direction. Carpet has a grain. Look at how the fibers lean. Your donor piece must face the same direction as the surrounding carpet or it will always look like a darker or lighter patch.
Trace around the donor piece with your marker. Using a fresh blade, cut along the traced line through the damaged carpet. Remove the burned section. A sharp blade is critical here. A dull blade pulls fibers and creates fuzzy edges that make the seam more visible.
Step 3: Prepare the Subfloor and Apply Tape
Clean any debris from the exposed subfloor. Cut a piece of carpet seaming tape slightly larger than the hole. Slide the tape under the existing carpet edges, adhesive side up. Half the tape should be under the existing carpet, half exposed in the hole. If using hot melt tape, you will need a seaming iron to activate it, which is overkill for a small patch. Use self-adhesive carpet tape or double-sided carpet tape for small repairs.
Step 4: Set the Donor Patch
Place your donor patch into the hole. Check the pile direction one final time. Press down firmly across the entire patch, especially at the seams. Walk on it. Place a heavy book on it for an hour.
Step 5: Blend the Seams
Once the adhesive has set, use tweezers to pull any trapped fibers out of the seam. Gently brush the seam area in circular motions to intermingle fibers from the patch and the existing carpet. Vacuum the area. This blending step is what hides the repair. A perfectly cut patch that is not blended will still show a visible line.
A Comparison of Repair Methods
| Feature | Surface Scorch Repair | Deep Burn Patching |
|---|---|---|
| Time required | 5 to 10 minutes | 30 to 60 minutes |
| Skill level | Beginner | Intermediate |
| Cost | $0 if you own scissors | $10 to $20 for tape and blades |
| Invisibility on cut pile | Very good | Good to excellent with blending |
| Invisibility on loop pile | Poor | Moderate to poor |
| Risk of making it worse | Low if you cut conservatively | Moderate if you cut donor piece incorrectly |
Special Considerations for Different Carpet Types
Loop Pile and Berber Carpet
Loop carpets are unforgiving. When you cut a loop, it unravels over time. A surface trim on a berber carpet stops the unraveling at that spot, but it leaves a visible divot. Patching loop carpet is possible but the seam is often visible because loops do not intermingle like cut pile fibers. For loop carpets in visible areas, a professional repair using a power stretcher and specialized seaming tools may be worth the cost, typically $100 to $200 per patch.
Wool Carpet
Wool burns differently than synthetic carpet. It does not melt into hard plastic-like beads. It chars and turns to ash. Wool also singes with a distinct burnt hair smell. The trimming method works on light wool scorches, but wool fibers are more delicate. Use very sharp scissors and a gentle hand. For deep burns in wool, patching works the same way but be aware that wool carpet fades significantly over time. Your closet donor piece may be darker than the surrounding floor.
Synthetic Carpet (Nylon, Polyester, Olefin)
The vast majority of modern residential carpet is synthetic. These fibers melt under heat. This melting can actually help small patches because the cut edges are less prone to fraying. The patching method described above works best on synthetic cut-pile carpet.
Common Mistakes You Should Avoid
Using a razor blade to shave the burn. Some online advice suggests shaving the black off with a razor. This cuts fibers at inconsistent lengths and often gouges the carpet. Use scissors with fine control instead.
Cutting the donor patch first, then trying to match it. Always cut the donor piece, place it over the damage, and trace around it. This ensures a snug fit. If you cut the hole first and then try to cut a matching plug, you will almost certainly end up with gaps.
Ignoring pile direction. Carpet fibers lean one way. A patch installed against the pile direction reflects light differently and looks permanently darker or lighter. You have been warned.
Skipping the blending step. Cutting and sticking the patch is only half the job. The brushing, fiber picking, and vacuuming is what makes the repair disappear. Spend as much time blending as you do cutting.
Burning yourself with hot glue. If you use a hot glue gun to secure seams instead of tape, be careful. Carpet backing and hot glue are a recipe for burned fingertips. Work slowly.
When You Should Call a Professional
Some situations call for hiring a carpet repair technician.
- The burn is larger than a fist.
- The carpet is a high-end wool or patterned carpet.
- The damage is in the absolute center of a room with no furniture to distract the eye.
- You are a renter with an upcoming inspection and zero margin for error.
Professional carpet repair typically costs between $75 and $250 depending on the patch size and carpet type. This is significantly cheaper than replacing the entire room's carpet, which can run $500 to $2,000 or more.
How to Prevent Future Carpet Burns
Prevention is easier than repair. Keep a fireproof mat in front of fireplaces. Never place hot styling tools directly on the floor. A silicone heat-resistant mat on your vanity costs under $15 and eliminates the most common cause of carpet burns. If you use a space heater, ensure it sits on a hard surface, not directly on carpet. Many modern space heaters have tip-over switches, but the bottom can still get hot enough to scorch synthetic fibers over time.
Frequently Asked Questions
Can I dye the burned area instead of patching?
No, this does not work. The burn physically destroys the fiber structure. Dye cannot rebuild melted or missing fibers. On a surface scorch where only the tips are dark, trimming is faster and more effective than any dye product.
What if I do not have matching donor carpet?
Check closets first. Then check under stair risers if you have carpeted stairs. Some installers leave remnants in attics or basements. If you absolutely have no donor piece, you can sometimes harvest fibers from an inconspicuous area and glue them onto a backing material, but this is a tedious process that rarely looks seamless. At that point, a professional may need to source a match through the manufacturer.
Will my landlord notice the repair?
A well-executed patch in a low-traffic area, properly blended, is very difficult to detect. A poorly executed patch with visible seams, wrong pile direction, or unmatched color is immediately obvious. Be honest with yourself about your DIY skills before you risk your security deposit.
Does renters insurance cover carpet burns?
Most standard renters insurance policies cover accidental fire and smoke damage, which can include carpet burns from a specific incident like a dropped iron. However, your deductible applies. If your deductible is $500 and the repair is $150, the claim is not worth filing. Check your policy for specifics.
Can I use carpet from a different room as a donor?
Only if the carpet is truly identical, same manufacturer, same style, same dye lot, and has experienced similar wear. Carpet from two different rooms, even if originally the same, will have faded and worn differently. The mismatch will be visible.
How do I fix a burn on carpet that has a pattern?
Patterned carpet makes patching exponentially harder because you must align the pattern across the seam. This is advanced work. If you attempt it, cut your donor piece to include a complete pattern repeat. Align the pattern perfectly before cutting the hole. For patterned carpet in visible areas, I recommend a professional.
Key Takeaways
Identify whether you have a surface scorch or a deep burn before you start. Surface damage responds well to careful trimming and fluffing. Deep damage requires a donor patch from a hidden area. The difference between a repair that is invisible and one that is obvious comes down to pile direction alignment and seam blending. Take your time with the finishing steps. Rushing the blending is the number one reason DIY patches look obvious.
If your carpet is a loop style or a visible patterned wool, consider the risk carefully. An imperfect DIY repair can draw more attention than the original burn. In those cases, a professional repair fee is money well spent.
Now go look at the burn. Figure out which category it falls into. Check your closets for donor carpet. You likely have everything you need to fix this today.